Subcontractor onboarding checklist: a simple document process
By Simone Rabelo · 8 September 2026
A 10-step process to collect company documents, review uploads, and track expiry dates.
Before you rely on a subcontractor, you need the company details and documents your organisation requires.
There is no universal list. Requirements change with country, industry, type of work, contract, customer, and risk.
Do not copy someone else's certificates and assume they apply to you. Build a repeatable process around the requirements you have already decided are appropriate.
Here is a 10-step framework.

Photo 01
Step 1. Create one subcontractor record
Create a company record with name, primary contact, and email. Add a registration or VAT number, telephone, and notes if you need them.
You can see document status in one place.
Do not keep company details in a spreadsheet, files in a folder, and reminders in someone's calendar.
Step 2. Confirm who your main contact is
Requests need somewhere to go. Record the person who will respond. Keep their name, work email, and telephone current.
Reminders do not help if they go to someone who left six months ago.
Step 3. Decide which document requirements apply
Not every subcontractor needs the same documents.
You might use types such as Public Liability Insurance, Company Registration, ISO certification, Safety Certification, Waste Carrier Registration, or Electrical Contractor Licence.
These are examples, not a legal checklist. You decide which requirements apply, with professional advice where you need it. Then assign only those requirements.

Photo 02
Step 4. Define what information you need with each document
The PDF is not always enough.
For some requirements you also need an issue date, expiry date, reference number, or notes. Some documents never expire.
Define this when you create the requirement. Do not improvise each time someone uploads a file.
For example:
Public Liability Insurance
- Expiry date: Required
- Issue date: Optional
- Reference number: Required
Company Registration
- Expiry date: Not required
- Reference number: Optional
A consistent structure makes tracking easier.

Photo 03
Step 5. Send one clear document request
Once you know what is required, tell the subcontractor.
Do not send a vague message such as:
Send all your compliance documents.
Make the request specific:
Example Construction requires the following documents from ABC Electrical:
- Public Liability Insurance
- Company Registration
- Safety Certificate
Give them a simple way to respond.
The path is:
Email → secure link → upload → confirmation
They do not need training to send you a file.
Step 6. Make the upload process easy
Your organisation chose the software. The subcontractor did not.
If they only upload now and then, asking them to sign up can add friction without much value.
For a simple request, use a secure link. They can see who is asking, which subcontractor it concerns, which requirements need attention, the status of each one, and where to upload. Nothing more is required.

Photo 04
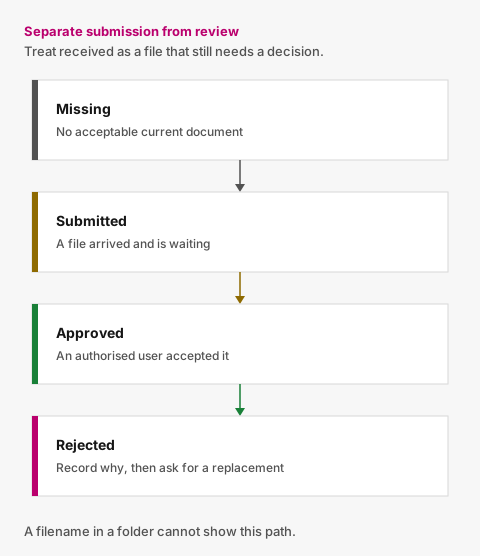
Figure 01
Step 7. Review every submission
A file arriving does not mean the requirement is met.
A subcontractor might upload the wrong file, an expired certificate, an unreadable scan, a certificate for another company, or something that does not meet your requirement.
Use a clear review process.
Pending review
The document has arrived. No decision yet.
Approved
Your authorised user has accepted the submission against the configured requirement.
Rejected
The submission does not meet the requirement and needs a replacement.
If you reject a document, record a useful reason.
For example:
Certificate belongs to the wrong company.
That helps more than:
Rejected.
Step 8. Show the current status
After review, every requirement needs a clear operational state.
Missing
No approved current document exists, and no suitable replacement is waiting for review.
Pending review
A new submission is waiting for a decision.
Current
An approved document exists and is not close to expiry.
Expiring soon
An approved document is nearing its expiry date.
Expired
The approved document has passed its expiry date, and no approved replacement exists.
These statuses make the record easy to read. They are workflow statuses for the requirements you configured. They are not a determination of statutory or legal compliance.

Photo 05
Step 9. Start expiry tracking immediately
Onboarding is not finished when you approve the first set of documents. Some of those files need replacing later.
This is where many processes fail. A team collects everything at setup, saves it in a folder, and stops looking. Then a certificate expires.
If a document has an expiry date, treat that date as data you can act on.
30 days before expiry
Flag the requirement as approaching expiry and request a replacement.
14 days before expiry
Follow up if you still need a file.
7 days before expiry
Continue follow-up.
Expiry
Mark the requirement if no acceptable replacement has been approved.
Onboarding starts a renewal process, not a one-off filing job.
Step 10. Preserve the document history
When a replacement arrives, do not overwrite the previous file. Keep current, previous, and rejected submissions.
That is clearer than insurance-latest.pdf. A colleague can see what happened without searching old email.
Your subcontractor onboarding checklist
- Create the company record and keep the main contact current
- Assign only the document requirements that apply
- Define expiry dates and other metadata up front
- Send one specific request with a simple upload path
- Review each submission, then approve or reject it with a reason
- Track expiry, send reminders, and keep previous files
If you cover those stages, you have a repeatable process, not only a checklist.
Common onboarding mistakes
- Collecting every possible document. Take only what you genuinely need.
- Treating received as approved. Separate submission from review.
- Storing expiry dates only inside PDFs. Record dates you can monitor.
- Overwriting old files. A renewal creates history.
- Sending requests from personal inboxes. The process then depends on one person.
- Asking subcontractors to sign up for an occasional upload.
- Stopping at onboarding. A certificate you approve today might expire next year.
What your team can see when onboarding is finished
Open the subcontractor and see a simple status:
6 of 6 requirements satisfied.
Or:
5 of 6 satisfied. Public Liability Insurance awaiting review.
Or:
Action required. Safety Certificate missing.
Your users do not need six PDFs and three inboxes to see the current position.
From onboarding checklist to ongoing workflow
A checklist helps you remember the steps. A document-management system can keep those steps connected.
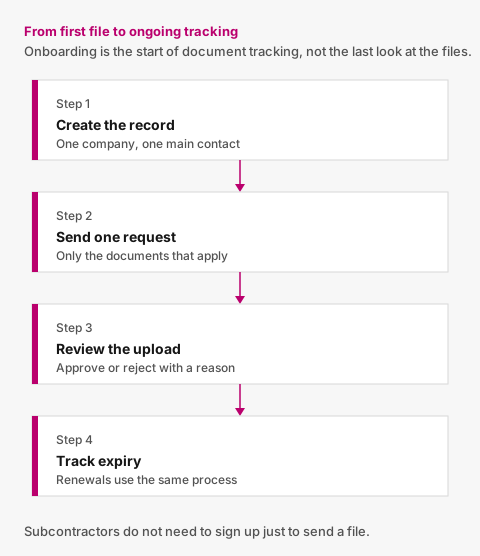
Figure 02
Valar follows a simple process: add a subcontractor, define required documents, send a secure request, receive uploads, review submissions, track expiry, and request replacements.
Subcontractors do not need to sign up just to send requested documents.
Your organisation still decides what documentation it requires, and whether a submission is acceptable. Valar keeps the workflow organised around those decisions.
Onboarding is the start of document tracking, not the last time anyone looks at the files.
Pair this with the subcontractor document checklist when you decide which files to ask for.
Photo credits
- Photo 01 by American Public Power Association
- Photo 02 by Campaign Creators
- Photo 03 by John Schnobrich
- Photo 04 by Kelly Sikkema
- Photo 05 by Eric Rothermel
Put document tracking in one place
You define what you require. Subcontractors upload from a secure link. Your team reviews. Reminders handle the rest.